Watering Controller
Watering controller are useful for proper irrigation to keep lawns and gardens healthy. However, watering plants manually is time-consuming and inefficient. In this article, we’ll walk you through the process of installing and programming a watering controller so that you can take full advantage of this valuable tool.
Step 1: Choose Your Watering Controller
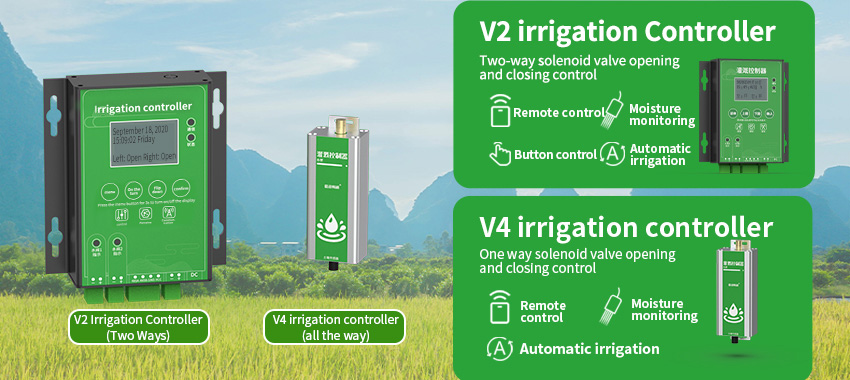
There are many types of watering controller on the market, from basic models with simple program settings to more advanced “smart” controllers that can be connected to Wi-Fi and controlled remotely. When selecting a controller, consider the size and layout of your property, the type of plants you’re growing, and how often you want to water them. Ensure that the controller is compatible with your existing irrigation system.
Step 2: Connect Your Watering Controller to Your Irrigation System
Connecting a watering controller to your irrigation system is crucial, as an improperly installed controller can potentially damage your system or cause leaks. Refer to the manufacturer’s instructions carefully, taking care to turn off the water supply and electricity before beginning installation.
Step 3: Determine Your Watering Schedule
Before programming your watering controller, it’s important to determine the watering needs of your plants. Factors that will influence your watering schedule include the time of year, the variety of plants you’re growing, and the weather conditions in your area. Most controllers have pre-set programs with different types of plants, but you may need to adjust these based on your particular needs.
Step 4: Set Up Your Program
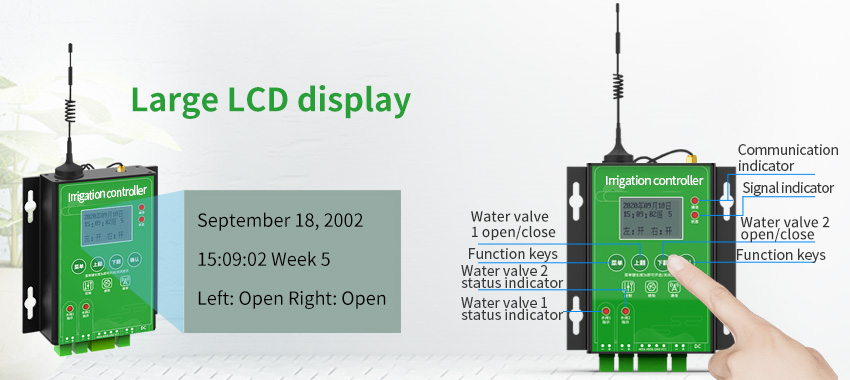
Now it’s time to program your watering controller. The exact steps will vary depending on the model you chose, but most controllers have several different program options available. These include frequency, duration, and time of day. Ensure that the controller waters at appropriate times, avoiding peak sun hours when much of the water will evaporate.
Step 5: Test Your Controller
Once you’ve programmed your controller, test it out to ensure it’s working correctly. Turn on your irrigation system and allow your sprinklers or drips to run for a few minutes. Check for leaks or any other issues that may need addressing. You may also want to monitor your plants after they’ve been watered to ensure they’re receiving the right amount of moisture.
Conclusion
Installing and programming a watering controller can help keep your lawn and garden healthy while saving time, money, and water in the long run. By following these simple steps, you can ensure that your controller is working efficiently, keeping your plants happy and healthy. Invest in a watering controller today – your garden (and wallet) will thank you!
I’m extremely inspired with your writing abilities as well as with the format for your blog. Is this a paid topic or did you customize it yourself? Either way stay up the excellent quality writing, it is uncommon to see a nice blog like this one these days!